April 17, 2025
I like making pizza.
When I first started it was pretty arduous. I actually had to grind the wheat to make flour for the dough. Making the cheese took forever. Toppings were a luxury unless I could find someone else who was making them and even then they could be really expensive.
As time went on, things got easier, though. I was able to buy bags of nice flour. Cheese was easy to get and a wide range of toppings became available. If I was really in a hurry, I could even find pre-made sauces that were pretty good.
More and more people got into making pizza so there were lots of new recipes out there to try, which was fun too.
Eventually I started seeing pre-made dough and even full kits with dough sauce and toppings ready to assemble and bake, which was pretty nice when I was in a hurry and just wanted something basic.
Then pizza delivery services popped up. I could just order whatever kind of pizza I wanted and it would show up at my door, faster than I could make one myself! Some of them were pretty good and it's a really easy way to get dinner when you're too busy to cook.
So now I have pizza whenever I want, which is pretty cool. I probably eat pizza more often now than I ever have.
I guess I don't really make pizza anymore, though.
🍕
March 19, 2025
There's been a lot of people noticing that the internet isn't as fun as it used to be. Not that it was perfect in the past, but there's a sense that what was once weird and quirky and full of potential (while still having a number of rough edges) is now mean and manipulative and controlled by a small number of large companies.
For many of the more tech savvy people who are feeling this, there's a lot of push to leave all of these unpleasant places behind and live entirely in alternative spaces. This might mean getting Google out of your life, leaving Twitter or Facebook or whatever major platform. But that's hard if you want to interact with people who don't think about tech all the time. It's the digital equivalent of homesteading.
I've been trying to be more conscious about trying to make my online life more pleasant in pragmatic ways. Ways that make me happier without feeling isolated from my less tech focused friends. More "growing some of my own food at home" and less "moving into a cabin in the woods".
Actual Social Networks
I've never found Twitter or Instagram to be particularly toxic places and I think that's because I've used them in an odd way. I only really follow people I know personally and I try my best to avoid algorithmically suggested posts. I will sometimes manually visit the profiles of interesting accounts, but the extra friction prevents me from passively consuming everything they post in perpetuity. This means my feeds on these sites are mainly friends and old coworkers who I actually like. I'm sure I'm missing a lot of funny videos and maybe some interesting content, but I think I'm happier this way.
Tending My Own Garden
That said, I've been less inclined to engage on other people's platforms lately. The internet was weirder and more fun when it wasn't just people posting to handful of huge sites. I've been writing more on Don't Break Prod and doing more little updates to this site, with the plan to share more things here. Again I haven't deactivated my accounts on any major sites, I'm just not really interested in building my castle in other people's kingdoms (even if that costs me priceless things like "engagement").
Let's Get Weird Again
Finally, I'm looking around more for weird fun things on the internet. People just building stuff because they wanted to see it exist. While a lot of the internet feels mean or angry or hustle focused or just un-fun in a lot of ways, there are still lots of people who just want to make cool stuff and share it. It's out there if you just poke around a little bit. I'm hoping the stuff I put out there contributes just a little to making the internet a bit weirder.
I don't think it's just rose colored glasses that make me think that the internet was more fun in the past. While many things have gotten better, something valuable has been lost. You can't go back, but you can focus on the things that make you happy and minimize the things that don't. It's not as bold a statement as dramatically quitting Facebook only talking to your friends who use Signal, but the internet can still be fun if you just don't wallow in the worst parts of it.
March 3, 2025
This all started with my irrational desire to build yet another blogging engine. The world doesn't have enough of those right?
I'll go into more detail about the software I built in a future post, but long story short I built a little blogging tool called Postwave and I needed a site to put it through its paces. I needed something that I could make frequent posts to and see what it was like to really use what I had built. So I created Don't Break Prod, a collection of bite sized pieces of career advice for software engineers.
I've been thinking about mentorship and ways to have a good life as a software engineer for a long time. I have a bunch of notes and a decent outline for a book of engineering mentorship that I started and lost steam on a few years ago as well as insights gained from being both a mentor and mentee. Eileen and I have had great conversations about career stuff that I often walk away from with good insights. So I started writing down a list of ideas about how to make your life better as a software engineer. These range from simple technical ideas like, embracing linters to broader ideas about avoiding burnout.
The idea behind Don't Break Prod is to do short form posts, something longer than a tweet but shorter than a full blog post. The title should give you the basic advice, the content should provide some food for thought around it. This has also lowered the activation energy for me to write new posts regularly, which helps a lot. I've deliberately avoided having a comment section because while I want people to read these and engage with them, I really didn't feel like managing a community.
I'm not really sure what my big picture goals are for Don't Break Prod. It's doing a good job as a testing ground for Postwave and in a time where it feels like most content just exists on a few social networks it feels good to be writing directly on a site run myself. As for the content of the site, I think that having a career tha makes you happy and fits into your life the way you want is important. Thinking about these posts has helped me articulate ideas that are useful for me and I hope other people find them valuable.
While I've been sporadically posting to the site for a few years now, I've recently been getting a little more serious about making regular posts and trying to share them more broadly. I'd love to reach as many people as possible, as long as I can keep writing posts and promoting them in my own weird way.
September 11, 2024
I always forget to move my car on street cleaning day.
On the 1st Wednesday of the month I was always scrambling to move my street-parked car in the hopes of avoiding a ticket. Often too late. So I wanted something I looked at every day to remind me of things like this, just a little dashboard in my kitchen to let me know what was going on during the day.
While this isn't a particularly novel idea and I'm sure there are a few out of the box products that will do this, I just though it would be fun to build something custom for what I wanted. It ended up being a small Sinatra app and I decided to play around with htmx for most of the dynamic frontend stuff. The basic features I wanted were:
- a big clock (date and time)
- local weather
- a QR code to log on to our local wifi network
- events for today and tomorrow:
- city events (street cleaning, garbage day, snow plowing, etc.)
- birthdays (I don't look at Facebook enough anymore for it to be a reliable reminder)
- our shared Google calendar
This is what it ended up looking like:
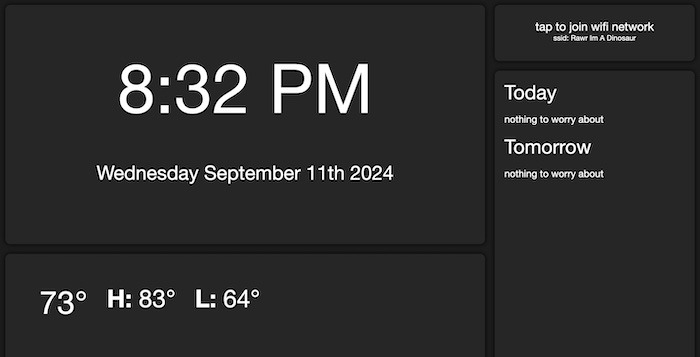
Some of these were pretty simple. The clock is just some plain old Javascript running client side. Birthdays come from a big hardcoded Hash that just looks up date. The city events came from some hardcoded logic based on the date, things like:
# first Wednesday of the month
applicable = STREET_CLEANING_MONTH_RANGE.include?(timestamp.month)
&& (timestamp.wednesday? || timestamp.tuesday?) && timestamp.mday <= 7
The QR code just seemed like a neat little feature. You can create QR codes that when scanned will allow you to join a local wifi network without manually entering the password. I just generated my code from something like this site.
For local weather I ended up making use of the OpenWeather API. It refreshes infrequently enough that I can use it for free.
The Google Calendar integration gave me the most trouble. For some reason it was WAY more of a pain in the ass to authenticate with Google and use the provided library to pull a list of calendar events than I figured it would be. It involved a lot of creating and refreshing access tokens and is still a little janky (but it work!).
While I started doing the dynamic front end stuff with vanilla Javascript I ended up rewriting almost everything in Htmx, mainly because it seemed interesting and I wanted to play around with it. For the VERY simple stuff I was doing (mainly periodically refreshing parts of the dashboard to get updated content) it was very clean.
For example, I want my weather to reload every hour so on the main dashboard page (the page that stays up all the time) there's a div that looks like this:
<div class="content_box weather_box" hx-get="../api/weather_htmx"
  hx-trigger="load, every 3600s">
</div>
It just pulls the contents of /api/weather_htmx (which is just some html, rendered with the updated weather info from an API call to OpenWeather) and puts it inside that div. Magic!
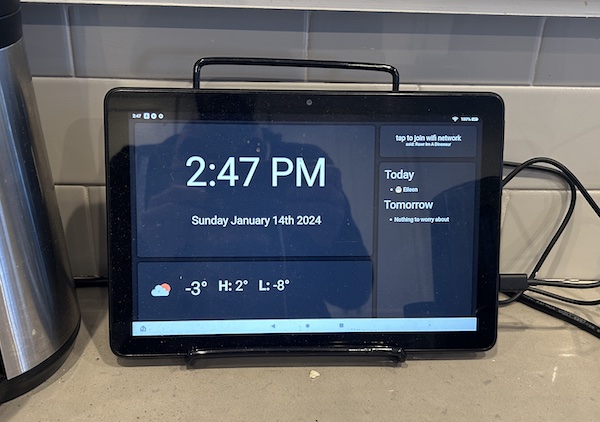
I bought a cheap refurbished tablet to use as a display and it's been a great addition to our kitchen!
August 21, 2024
So I added a Now page to this site.
The purpose of a now page to write up what you're doing right now. Basically what you'd tell someone if you were catching up and they asked "So what have you been up to lately?". The idea has been attributed to Derek Sivers (who apparently is the guy who created CD Baby!).
Why did I add one? Do people really care what I'm up to now? I don't know. But I've been growing a bit disenchanted with the state of the internet lately. It feels like a lot of people trying to squeeze posts in between ads on a handful of social networks. I miss when the internet was more distributed and a bit more personal and weird. This felt like a little push in that direction.
For more about now pages check out nownownow.com
December 6, 2023
tldr: I wrote and recorded a noisy, bass driven solo record. You should check it out!
Earlier this year I was listening to a lot of Death From Above 1979 and just got the urge to write some fast, high energy song with just bass, keys, drums and vocals. Sort of a cursed jazz trio. I was also looking to push my drumming, which has been a focus this year.
I started just writing and recording a bunch of bass riffs when I had random nights free and then I'd come back later, narrowing down which riffs I liked the best. Because I was just writing on bass I felt like I ended up writing riffs differently than I would if I were writing on guitar. I felt more free to wander out of keys and write more chromatically, since I wouldn't have to fit things in a larger chord structure. It was really a fun way to write.
From there I started piecing together some basic song structure and trying to figure out what to write lyrics about. I tired to let the topics of these songs be a bit more "whatever popped into my head", worrying less about having central, cohesive ideas. I ended up writing about social media (Black Box), people reminding me to eat well (Eat This, You'll Live Forever), and our cat, who likes to hunt our children (Natural Predator).
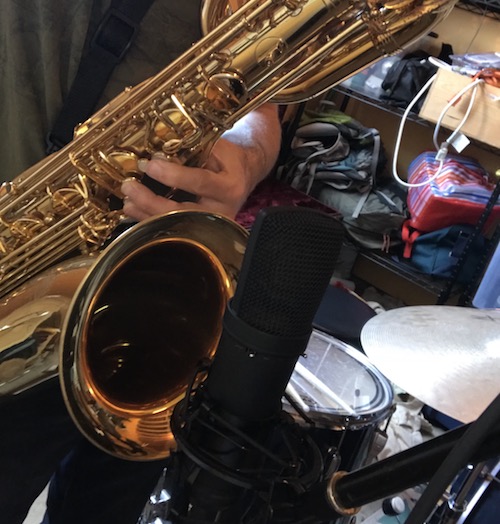
Once I had the song structures down I recorded bass (DIed into Logic with a fuzzy amp model) and then started really working on writing/recording drums. This project ended up being a good excuse to dive a little deeper into recording drums at home. I picked up a kick drum mic off of Craigslist, gathered a bunch of 57s to mike the snare and both toms, and used one of my condenser mics as an overhead. It had fun playing around with getting a decent sound and learned a bit about recording drums. My basement is not the best space to record, but I made due.
The drums took me a long time to record. Part of this was nailing down exactly what the drum part should be and part of this was playing it right. I'm really glad I did all the tracks to a grid. It helped to be able to follow a click and punch in where I needed to.
After the drums were finished I worked on vocals. I was probably most nervous about this part since vocals have never really been a strength of mine. I tried to just let go, project, be loud where it made sense, be a little screamy where it worked, and just commit. I also leaned into using a bit of fuzz on the vocals, which fit nicely with the aesthetic of these songs. All in all it turned out well. It's certainly not the greatest vocal performance, but there isn't much that feels bad or like the vocals detract too much from the songs.
While recording "Eat This, You'll Live Forever" I had the kids come in and sing "Eat this!" and used their takes to build gang vocals in the outro. I'm really glad I got them involved and they seemed to really like hearing their vocals as I was mixing things.
I finished up by adding some keys. Mainly synth or organ parts doing some countermelody or beefing up some parts. After that, a bit of mixing. I ended up doubling all the bass parts, one track with some fuzz/overdrive and another with a lower, cleaner sound to beef things up.
In the end I came out with something that I was really proud of. This is the first time I've done a true solo record where I've played every instrument and done all the vocals (apart from some gang vocals by my kinds). I didn't really know what to do with it so I just put it up on Bandcamp and sent the link around. I'd love for more people to listen to it, but honestly, I'm just happy I made it. And Or Not is a fun format, bass driven, high energy, so maybe I'll do some more of these songs soon!
July 11, 2020
Many good projects come from scratching your own itch. I like to track thing.
Over the past few years I've had on and off bursts of focus on practicing. Practicing guitar, drawing, chess, things like that. And I always find value in quantifying how often I'm practicing. I like to know how many hours per month, week, year, etc. I've spent on that skill. I feel like, as long as I'm practicing the right things, I can feel good about the progress if I can see a history of it. Plus wanting to see the numbers can help make sure I stick with things.
In the past I was just writing simple Markdown docs and then ran a small Sinatra app that pulled metadata out of that directory and gave me some historical stats. I called that system Input Coffee.
I figured I could automate things a bit more and build something a bit more reusable, so I decided to build a small command line based tracking app, Trackstar. I recognize that this type of interface only appeals to a very select group of people, but that group includes me, so I built it.
It's a pretty simple idea. You use the trackstar -n program to create a log directory, then (when you're in that directory) just use the trackstar command to make a new entry. It will prompt you for a few things; title, time, and some notes, then turn it into a Markdown file. You can get some basic stats by running trackstar -s (again, in the log directory).
It's pretty bare bones right now and I'd like to iterate a bit on the interface (I do thing command line apps can have nice interfaces). I'd also like to do a lot more around the stats, maybe even pull in the Sinatra app/web based visualizations of the data to get a better history, we'll see. For now it's kind of fun to keep it as a purely terminal interface.
The whole thing is just built in Ruby and could probably stand to be optimized a bit, but it was fun to build a gem that was a pure executable thing, rather than a library. You can check out the code and full instructions for how to use it on the GitHub repo.
I'm currently dog fooding it by tracking my guitar practice. So far it's working pretty well and I'm making tweaks as needed. If this scratches a specific itch you have, try it!

January 30, 2019
At the end of October I put out a 3 song record, Let 'er RIP!, with my skath band, Grave Danger.
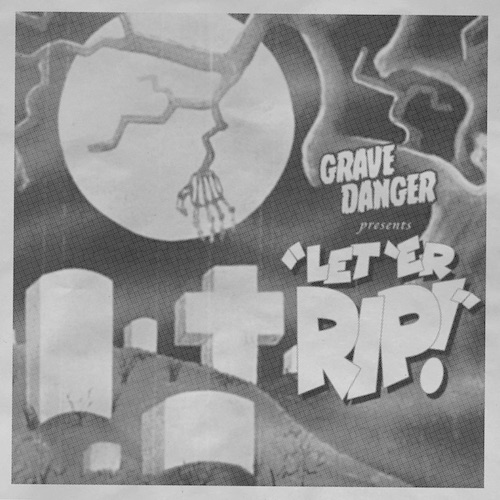
(It's available on Spotify, Apple Music, Bandcamp, Soundcloud and lots of other places!)
I wrote about some of the songwriting in this post but the recording process for this record was very different from anything else I've ever worked on. Since I was playing a lot of the instruments and we were never going to have everybody in the band all together at once it would be a really piecemeal process.
The Rhythm Section
First Dane did some rough recordings of his drum parts using the demos I had created. This let me do my recording over a live drummer rather than programmed drums from Logic Pro. This really helped me get a better feel for the songs and made things feel much more organic. While I was recording over new drum parts I built the "working" versions of the songs from copies of the demos, that way I could just swap out the demo parts for final parts rather than having to build the song again from scratch. It was pretty cool to hear the songs evolve just by swapping in better recordings one instrument at a time.
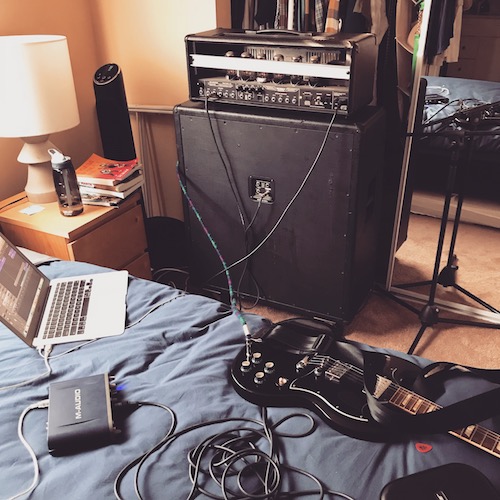
My first work was laying down guitars. I actually ended up using the same amp model I used in the demos for the clean track but did all of the heavy guitar parts through my Dual Rectifier miced with a SM-57. I ended up double tracking almost all of the rhythm guitar parts (both clean and heavy) and I was really happy with the thickness that gave me. Most of the miced recording was done in my bedroom (which is carpeted) with the amp facing a closet full of clothes. The tracks for Too Ghoul For School were done in the garage (mainly to make it easier to record while Elliot napped) and they ended up having a harsher sound.
The bass work was pretty straightforward. I bough a DI box and recorded all my bass parts through that. I did take my bass (and old Washburn) to get tuned up before I did any of the recording and it really made a big difference. The keyboard work was also pretty cut and dry. I actually used some of the demo keyboard work for the final version (the first arpeggiated organ chord in Grave Danger, for example!).
The Horns
The horns were a little tricker. The horns in the demos were all done via keyboard and I needed to share the parts with the other horn players. For this I sat down with MuseScore (in awesome piece of free open source software fore creating sheet music) and transcribed all four horn parts. It was really cool to see the sheet music for my arrangements and I think it really helped Margret and Andy lay down the trombone and trumpet parts.
I was doing the tenor and bari sax parts, but I only owned a tenor (which I had bough earlier this year, specifically for this project) so I needed to track down a bari. This was actually harder than I expected. At one point I emailed a local high school band teacher to see if the school could loan me one. Ultimately I had to rent one from a music shop about an hour away. I only had it for a week and that was still pretty expensive.
I recorded the tenor and bari parts and then sent Margret and Andy a mix of the songs with only the rhthym section and my sax parts so that they could record their parts on top of that. Dane set up some mics in his basement and over a few weekends they got all three songs done. I think this was a very new experience for them and it was awesome to hear all four horn parts together on real instruments.
The Drums (for real this time)
After recording the horns, it was time to do the REAL drum parts. After considering a few options we ended up going to Justin at Waysound Studios for the drum tracking. I've worked with Justin on a lot of projects when I was in bands back in Chicago and he's always fantastic. There's actually a live recording of Dane tracking these songs, if you want to watch about 4 hours of drum recording!
The drums turned out fantastic and added so much depth to the songs. Now it was time to do vocals.
Vocals (and everything else)
Vocals were strange. I had an idea of how they should sort of sound in my head and I did the vocals on the demo, but I knew that Alan was the right person to sing for this record. The problem was that he was in Minnesota and I was in California and we were only communicating through email. He did some rough demos of the vocals and I sent some notes back and then he recorded the final versions. The vocals were by far the weirdest thing to do remotely.
I also wanted Josh and Chris to add harmonies so I just sent them a mix with Al's vocals and let them just record a bunch of takes and send me whatever they had. I wanted to add a few background vocals parts, too so I set up a mic in the garage and layed down some of my own parts. I ultimately just picked a bunch of stuff that sounded good and pieced it all together.
While I was blindly working with the vocalists, Dane and Emily were recording Emily's synth and organ parts. I didn't have these in mind when I was arranging the songs, but there are some synth parts that now seem like they obviously needed to be part of this music. They ended up being great additions.
Finally, I wanted to get my family involved. First I had Eileen do some high harmonies and "oooo"s in Too Ghoul For School (which was ripe for vocal layering), then as I was mixing I heard Elliot repeating the work "ghoul" during the chorus, so I recording him and added his vocals into a few sections of Too Ghoul. It was really fun to be able to give him his first record credit before his second birthday.
Putting It All Together
Now I was sitting in front of three enormous Logic Pro projects with up to 60 tracks a piece. I was not remotely qualified to mix what would probably be a 9 or 10 piece band so again we turned to Justin at Waysound. After fooling around with some clever exporting techniques, I ended up just removing any EQ and effects from all the tracks and exporting them all to WAV files and then sending those over to him so he could work his magic.
The whole recording, mixing, and mastering process took almost a year (with my "solo" recording using up the bulk of that time) but we had a finished product before our self imposed deadline of Halloween.
Recording the record in this way had its advantages. I liked being able to work at my own pace and on my own schedule (which was really important with a kid). The process of migrating the demo into a final version piece by piece made it easier to work on my own, since I never had to bootstrap the songs from scratch.
It was really hard to work in isolation though. I'm used to being in the studio with other people who can provide feedback and keep me from getting in my own head about guitar tone. I missed the comradery of hanging out in the studio with friends. I augmented this by texting Dane a lot during the process. Technically, if I did this again, I'd be more diligent about making sure EVERYTHING lined up with a click track from day one. When pulling in parts from many different sources, having one source of truth for timing is really important.
I can't overstate how much fun I had making these three goofy songs with a bunch of friends. Even though they're ridiculous in subject, they really mean a lot to me and I loved the process working on them. I already have the seeds for several more Grave Danger songs and I'm excited to work on new material!
If you haven't heard the record yet, please take a listen:
November 6, 2017
Last May I got a txt out of the blue from Dane, a good buddy, great drummer, and former bandmate:
"Ok dude. Let's do it: Let's write a couple of skath songs."
Dane and I used to play in a ska band called Captain Supreme back in college. After Captain Supreme broke up we joked around about forming a new ska band, dressing up like skeletons, and writing songs about graveyards and monsters and ghosts and stuff. It would be skath!
It was a fun idea, but I assumed it would be like all of the other hilarious band ideas I'd had with friends: fun to talk about but we'd never write anything. Well, for whatever reason this was different. I got really excited and we started trading song name ideas: "Grave Danger", "Escape From Skull City", "Hearse Chorus Hearse Chorus", "Spider!? I Barely Know 'er!". In a fit of inspiration I wrote the lyrics to "Grave Danger" on the spot and we started talking about who else we could get involved. That weekend I started writing some music and it seemed like a project that we could really get off the ground.
Eventually I realized that if we wanted to have some actual songs to record, I'd have to get serious about writing. Inspired by Dane's participation in #5amwritersclub I decided that I could get up a little early every morning and actually get some creative work done. While I'm not crazy enough to wake up at 5am, I did get up before 7:00 and found 30 minutes to an hour almost every day to make progress on these songs.
It felt really good.
I felt like a musician again and I felt like a songwriter again. Most of the songwriting I had done since leaving The American Autumn was done in single sessions. If I could get a full song out in a night, it didn't get done. This was different. I struggled through false starts that just wouldn't come together. I had to figure out how to connect parts that were cool on their own but needed to sound cohesive. I had to arrange a four part horn section without overwriting things. It felt good to put in the work on a creative project.
About six months later I now have three songs demoed: Grave Danger, Escape From Skull City, and Too Ghoul For School. I recorded all the music and vocals myself, using a keyboard for horns and Logic Pro's drums. Now I'm ready to do real recordings of this. I'll still play a lot of the instruments, Dane will be doing the drums, and we'll be getting other people involved to do vocals and other horn parts.
Six months may seem like a long time to write about 10 minutes of music, but I'm really proud that I was able to get these songs written and demoed while having a new baby and a busy job. What are we going to do with this recording? I'm not sure. I don't know if the world is clambering for ska songs about ghosts, so I might not quit my day job but that's ok. I really just want to see these songs exist.
Here's a few snippets of the demos:
July 11, 2017
If one listens to enough Ruby related blogs and talks and podcasts they are likely to run in to Crystal. Have you every thought, "I like Ruby, but I wish is were fast and compiled on LLVM"? Well, that's Crystal. It's a fast language with Ruby inspired syntax. If the performance benchmarks shown on the Crystal site are even remotely accurate, it's worth checking out.
I enjoy writing Ruby and I like things that are fast, so I've been trying it out. While it is still pre-1.0 it's been pretty nice to work with. And since it's a new language, there's an opportunity to write new libraries (known as "Shards" in Crystal).
My first Crystal Shard has been a money handling library, inspired by Ruby Money, that I call Moola. It gives uses the ability to define Money objects and do basic operations and conversions with them. Here are a few examples:
money = Moola.new(42_00) # creates a new Moola::Money object
money.format # "$42.00"
money.cents  # 4200
money.zero?  # false
money.to_f # 42.0

Moola::Money.new(5_00) == Moola::Money.new(5_00) # true
Moola::Money.new(5_00, "USD") == Moola::Money.new(5_00, "EUR") # false

Moola::Exchange.add_conversion(Moola::Currency.find("usd"), Moola::Currency.find("cad"), 1.3)
money = Moola.new(1_00, "USD")
money.convert_to(Moola::Currency.find("cad")) # Moola::Money(1_30, "cad")
I don't have much to say other than it seems like a great language if you like writing Ruby. For a newer language it's been a joy to work with and it's fun to build some basic libraries.
If you every find yourself writing Ruby and dealing with money, I encourage you to try out Moola.