May 26, 2016
On May 25th of last year I started keeping track of my focused practice time for a few things I wanted to get better at. As mentioned in this post, I was motivated by reading Make It Stick and the idea that getting better at something didn't always feel like progress simply because it should be hard.
I built a really basic time tracking tool, which turned out to be a really strong motivator. Seeing a graph of my practice time each week made me want to keep focused. Here's the graph from the past year:

I didn't do as much as I had hoped but I feel like I made some decent progress. My final numbers were:
guitar: 81 hours (128 posts)
art: 21 hours (39 posts)
chess: 5 hours (10 posts)
vocals: 1 hour (2 posts)
Obviously I wasn't that focused on vocals and I kind of gave up on chess pretty quickly, but I made a decent showing for guitar work.
I didn't let myself count noodling while watching TV or going to band practice. This had to be focused practice where I was really trying to learn something new or fix something sloppy or work on a skill I was lacking. I would have liked to hit 100 hours but 81 is still a lot more than I've put in any year prior.
Art was a mild success. I did count my time doing Inktober because a lot of that was drawing novel subjects, but a lot of the other work was fundamental practice and sketchbook work. I also spent some time ramping up with drawing digitally, which I now use a lot for Look At Me I'm a Racecar comics.
This Input Coffee project has really been helpful in getting me to work on skills that I actually care about. Over the next year I'd like to hit 100 hours of guitar and branch out a bit to some under-practiced skills I'd like to have.
February 10, 2016
I built something!
Once again I received a Build Your Own Clone pedal kit for Xmas, this year it was the Classic Compressor. I've been playing a lot more guitar these days and I seemed like it would be fun to tighten up my sound a bit, so a compressor pedal seemed like a fun project.
The build itself was pretty simple and straightforward. Soldier all the pieces together. Don't burn myself. Don't burn anything important. I'm actually getting pretty decent at soldiering, if I do say so myself! What I wanted to do differently with this build was the visual look of the pedal.
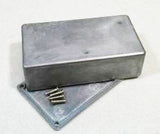 The enclosure that comes with the kit is... utilitarian, to say the least. This time I wanted to not only paint the enclosure, but also design and print my own decals for the pedal. The painting was pretty simple, I just sanded down the enclosure, put down a coat of primer, and then used several coats of spray paint.
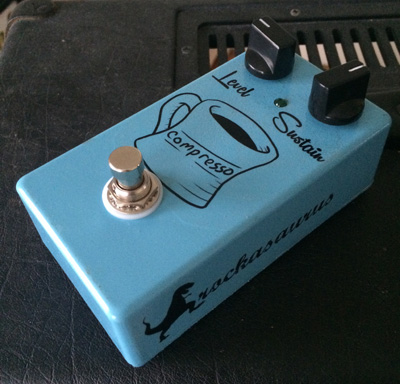
To do the design decals I ended up drawing some stuff using my Wacom tablet and then doing a layout in Photoshop and finally printing everything onto waterslide decals. For the design I ended up just drawing a simple coffee mug with the word "compresso" on it because it sort of sounds like espresso. Meh... it kinda works! The waterslide decals were pretty cool, you just print onto them, spray them with a clear sealant, wet them and then slide them onto the surface. Once it dried, I sprayed the whole thing with a few layers of clear sealant so the decal would chip or peal off as I stomped on it.
Last, but not least, I wasn't quite satisfied with the nobs that came with the kit. I wanted something a bit more retro looking so I bought some oven nob style nobs on Amazon to use. They didn't quite fit the pots on the pedal so I had to Dremel them out a bit before I could put them on the pedal. It's always fun to have an excuse to play with a Dremel.
The end result looks pretty cool (and sounds pretty good too!) I actually took apart the first pedal I built, an overdrive, with the intention of painting and adding a decal to it as well. The stuff I learned doing this pedal will be very helpful.
Here she is:
November 1, 2015
September 27, 2015
One of the first posts I wrote on the new version of this blog was about my genetic algorithm Ruby gem, Darwinning. I actually started building the library back in December of 2012 when I was first learning Ruby and it's gone through several updates and periods of inactivity. Usually I'll just add some tests or make a small update when I have some free time. It's been a pretty casual project. I just didn't think that there was that much of a need for a Ruby GA library, I just thought it would be fun to make.
Recently I've seen a steady stream of people starring and forking the Darwinning repo on Github and I've received some really thoughtful and helpful pull requests from people, so I wanted to give the library a bit more attention. I had some free time this weekend and used it to finish off a major feature that I had been working on and finally published the 0.1.0 version of the gem!
The major feature I added was the ability to use Darwinning in existing Ruby models via include. This lets you utilize the library in projects that might not be specifically about genetic algorithms.
Here's my dumb, contrived example:
require 'darwinning'

class Triple
  include Darwinning

  GENE_RANGES = {
    first_number: (0..100),
    second_number: (0..100),
    third_number: (0..100)
  }

  attr_accessor :first_number, :second_number, :third_number

  def fitness
    # Try to get the sum of the 3 digits to add up to 100
    (first_number + second_number + third_number - 100).abs
  end
end
Then you can use some nice built in methods to generate a population of these objects and evolve them towards a fitness goal:
if Triple.is_evolveable?
  triple_pop = Triple.build_population(0, 10, 100)
  triple_pop.evolve! # evolve until fitness goal is or generations limit is met

  pp "Best member: #{triple_pop.best_member}"
end
I've been having fun working on this project and it's really cool to see some other people contribute to the project. If you want to play around with the library or have an interest in genetic algorithms just gem install darwinning or check out the Darwinning Github repo. There are always more updates to do, but it felt good to make some progress on this project.
August 10, 2015
Last weekend was my first wedding anniversary. We didn't really have big plans to exchange gifts but I thought it would be a good opportunity to finally record "Our Story", the song I used to propose to Eileen. I had been meaning to do this for a while, partially because I knew if I didn't I'd probably forget how to play it and that would make me a terrible husband.
If you don't want to read all my thoughts on recording the song feel free to just go listen to it now. I'll only be a little offended.
This song was written to be played live, only on acoustic, and has some holds that feel pretty loose so I had to start off by making sure I could actually play it with backing drum track. It took me a few tries to get the feel of it but I think it came together without sounding too rigid.
After recording the acoustic part, I got to have a lot of fun writing all the other things that go on top. I had a lot of fun with the bass and actually mixed some of the low end out of the acoustic to give the bass more room. The piano in the chorus really came together pretty nicely, particularly the hits under "I can't wait to write...". The left hand work there gave it some good body.
As usual, I was tempted to do more electric guitar noodling than I should but some after some editing I was pretty happy with the little theme I had in the verses. The lead part in the choruses ended up acting as more of a harmony that gave the chords an interesting sound at times.
There's a part in the 3rd verse right after the line "together with our furry child" where it sounds like someone just stepped on a piano. That's because the cat just stepped on the piano there. Since the line was actually about him I mixed it down but left it in.
The outro was interesting in this song. It was originally the verse or chorus of an early draft of this song that never really panned out, but I liked the lyrics and it was in the same key as the rest of the song so I really wanted to make it work. Also it was a nice held chord segue into actually popping the question, which was pretty important at the time.
I wanted to be sure this still sounded cohesive with the rest of the song, but still go out big and I think it turned out well. While I could have mixed it a little better, the pick slide into distorted power chords is just a lot of fun. The piano part was just something simple I stumbled on while I was messing around, but I really like what it adds. I ended up doing a lot of editing to decide which instruments should stop when and I'm happy with those choices. There was a lot of value in editing this song a few days after I had done most of the recording.
All in all, I was really happy with how this turned out and Eileen seemed to like it too. It's always fun to record original music and this song was particularly important to me.
July 14, 2015
So back when I was working at Berkeley (and had more free time) I decided to formalize the tracking of some of my skill improvements. These were mainly things like drawing, playing guitar, playing piano, vocals, comptuer science theory, etc. I set up a small WordPress blog called Input Coffee and just made posts for every session in order to keep track of what I had been working on. I liked seeing all the posts every month and having a record of what I was doing, but a blog wasn't the perfect solution. I wanted better ways to add up time per week or month for each type of task.
I decided to start tracking this sort of thing again, partially in response to reading Make It Stick, and I wanted a simple way to track my practice sessions for things like guitar, chess, drawing, and other stuff I'm working on these days.
I started by just creating Google Docs for each session, which worked fine and helped me not avoid doing real practice by spending a bunch of time building a complex system to track my practice. But then I gave in and built a system to track my practice. Like the original WordPress blog, it's called Input Coffee.
This system is pretty simplistic, just a Sinatra app that reads some Markdown files and turns them into CoffeePost objects so I can examine them based on tags, subject, date, and a few other fields. The Markdown files use a format very similar to Jekyll's posts and I just parse out meta data from the little header.
Here's an example post:
date: 2015-07-14
subject: guitar
tags: acoustic electric
hours: 1.0

Spent most of this session doing acoustic stuff...
I don't even have this hosted anywhere, I just run a local server when I want to see stats about my practice. Right now I just show total posts/hours (since May 25th, 2015), some breakdowns by subject (guitar, vocals, chess, drawing, etc.), and some numbers for the current and past week
Obviously, I'd like build out some more metrics and it might be fun to make a nicer interface, but for now this works for me and I've avoided overly-over engineering the solution. Being able to track this sort of stuff really helps keep me in good habits.
May 11, 2015
Eileen was out of town this weekend so, as I typically do in these situations, I took advantage of the time do some recording. As mentioned in previous posts, I've really been into the Aaron West and the Roaring Twenties record so I decided to finally record one of those songs, Divorce and the American South.
Here's a link to the song if you want to listen right away.
This is a pretty faithful cover. I didn't deviate too much from the original version and actually resisted my urge to add some lead guitar parts to the song. In place of the slide guitar, prominently featured in the original song, I focused more on the organ part to do something tonally interesting against the acoustic guitar. The organ also just fills the song out nicely without adding a bass part.
I also recorded some saxophone for the first time since recording the last Captain Supreme song, which was pretty fun.
This recording session gave me the chance to really work with with my new vocal mic (MLX 2003A) and my new monitors (JBL LSR305s). I ended up using the MLX for both vocals and the acoustic guitar and just used my SM57 for the sax. It was really nice to be able actually hear things in the mix with the new monitors. Hopefully the end result is better for that clarity.
As always, vocals were a challenge. They're not perfect but I feel like I'm making progress, which is always nice.
Enjoy!
April 20, 2015
I spend the vast majority of programming time working with Ruby these days. I've gotten to know it pretty well and it is honestly a joy to use, but I want to make sure that I don't just limit myself to a single language or even a single type of language (the occasional Python project doesn't quite count as adventurous). Out of curiosity and a desire to work with a more low level language I've started playing around with Rust.
Rust is a systems level language created by Mozilla that might be used in similar situations as C++. I haven't done anything this low level since I had to use C++ for a data structures class my sophmore year of college, which was a surprisingly long time ago.
I needed a small project to build if I was going to learn anything about the language so I decided to build a Bloom filter. A Bloom filter is a probabilistic data structure that is designed to be really space efficient and allows you to determine if something is "probably in the set" or "definitely not in the set". For example, web browsers use Bloom filters to store lists of dangerous websites, which is why you sometime get a warning for an obviously safe site.
The end result of this little project was Bloomfilter-RS, a small Rust library that implements a Bloom filter. It can be used like this to create a Bloom filter with 100 buckets and 5 hash functions:
let mut bf = BloomFilter::new(100, 5);

bf.insert("hamster");
bf.insert("coffee");

bf.check("hamster");
// (probably) true

bf.check("oatmeal");
// false
It was pretty interesting working with a lower level language coming from Ruby. I had to think about passing pointers and dealing with a much more robust type system. Fortunately working with Scala in the past prepared me a bit for dealing with generics and default immutability, but it really felt MUCH slower than working with a high level language like Ruby (which I suppose should be obvious).
I don't really have a major project in mind that needs a language like Rust right now, but I'd like to keep tinkering around with it just to expose myself to other types of langues. It's also just fun to follow a language as it's being built (as of this post Rust is still a few weeks away from it's official 1.0 release and some of the API still isn't quite stable).
Feel free to dig through my Bloomfilter-RS code and give me any feedback about style or a better way to use language features. It was certainly built as a learning experience.
February 7, 2015
January 11, 2015
So I posted my first Thing A Week post almost exactly 1 year ago today. The idea behind Thing A Week was to get myself to do more small projects with short deadlines and also get myself to work on a bunch of different things so I was producing something interesting each week.
While some weeks I did manage to work with in those bounds and produce a standalone project in one week (for example; the bass pedal, my cover of In The Garage, and the Therimino) I actually ended up spending a lot of my Thing A Week time on pieces of larger projects like RecLaboratory and the photo listener. While this wasn't the original intention of the exercise I was still able to use the model to break up chunks of work and produce stuff worth talking about almost every week.
In the end I did 36 Thing A Week posts last year. Not as good as the 52 I would have liked, but it still represents a lot of productive weeks. I also found it really valuable to write about what I was working on each week. I think I just really enjoy sharing both the finished product and the process for the projects I work on.
Here are some things I made last year:
While I really enjoyed doing the Thing A Week posts last year, this year I'm not going to have the same weekly goal. I may do some more Thing A Week style posts when I finish a project but I'm trying to focus more on just doing stuff rather than only on getting stuff done. For example, when I was writing music last year I focused a lot on writing things that I knew I could finish quickly so I ended up with a lot of short musical ideas, but not very many complete songs. I want to spend more time doing things like art, music, and coding (and whatever else sparks my attention) and doing it well. Maybe this means spending more time drawing in sketchbooks and less time making finished comics. Maybe this means starting a couple of songs and working on them until I'm REALLY happy with one.
I have a few project ideas (some big, some small) that I'm already starting to plan out, so I'll try to keep up with regular Thing A Week style postings discussing my progress on those things, even if it's just for my own enjoyment.

 The enclosure that comes with the kit is... utilitarian, to say the least. This time I wanted to not only paint the enclosure, but also design and print my own decals for the pedal. The painting was pretty simple, I just sanded down the enclosure, put down a coat of primer, and then used several coats of spray paint.
